Saturday, November 27, 2010

The Inside at Last.....

Getting close to the final pieces of the house over the last couple of weeks.  Tile, cabinets, paint and fixtures are being finalized.

In these shots you'll see the floors being tiled along with one shot of the master bath getting shower tile.

Our beautiful Neil Kelly kitchen is getting it's final touches this week and you can see that partial installation below as well. 

Tile wrapping around dining room wall to office

Floor tile partially in in living room

Final floors in and grouting
I'll expand on all these items in a later post, but wanted to get a few things up during the process.


Paul looking happy about the cabinets being installed  :)

Full view of the kitchen looking toward the dining room

Right Bank of our New Neil Kelly Kitchen
Master Bath Shower and wall tile

Monday, November 8, 2010

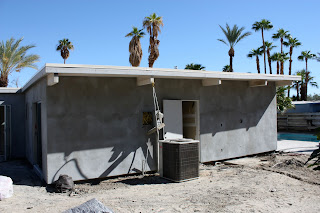
New Skin on the House

1st coat of stucco on the front of the house.


Finished rear patio...windows and stucco.

Front stucco complete.

Well.....just a quick update here to share the completion of the exterior stucco.  We had to do alot of new exterior wall replacement after adding insulation and new windows.  Now everything is patched in and ready for paint !  Check out the process above.

Sunday, November 7, 2010

The 'Cool' Roof

Welcome Back !  We are moving steadily toward our expected move in date of December 1, 2010.  The next series of photos all deal with our new roof system and the insulation we added to help the house to be more efficient.

The first couple of photos are of the old roof stripped off to the original tongue and groove planking that acted as roof and finished ceiling.  That isn't must insulating value between you and the 115 degree temps in the summer, so we decided to up the ante a bit.

The third picture shows the rigid foam insulation foam being delivered to the house.   The insulation comes in 4' x 8' panels.  Rather than put down 4" slab of insulation, we decided to offset 2 layers of 2.5" and 1.5" alternately and stagger the seams to help prevent thermal transfer through the panels.

After the insulation is secured down to the decking, it is covered with a membrane type cool roofing material called Fibertite.  The seams are overlapped on the roofing material and heat-welded together to form a water tight seal.  In addition to being the perfect color to reflect the sun, the new insulation gives us approximately a R-25 in terms of insulating value to help keep those cooling and heating bills down !

Next up....finishing the stucco outside

Bare Roof Deck

New larger fascia on the front of the house to accomodate the new insulation.

Insulation being delivered.

1st layer of rigid foam going down on the roof deck.

2 layers of insulation being covered by Densdeck material

Rolling out our cool Fibertite roofing material

Almost done !  Future stands for solar power

Sunday, October 10, 2010

The Walls Close In

The plywood sheer wall was put in place over the exterior wall for seismic upgrades after we sprayed the foam.  We then built a facade wall in front of the existing wall to create a recess for the television and sound system.

Master bedroom addition

Kitchen with greenboard looking from the dining room.

Newly framed out and drywalled living room wall

Master bath vanity wall and new window.

Now that the insulation is done, we can finally close the walls.  The spray foam expanded out, was shaved off even with the wood studs and is now ready for structural sheer walls then drywall.  Our drywall is now complete and awaiting mud and tape to complete the walls inside.

Our next task is to upgrade the existing roof to add insulation to that as well.  These houses were never built to be energy efficient, so our goal is to make it a much tighter and insulated structure by adding rigid foam to the roof.   We will replace it with a very exciting membrane cool roof which I'll talk about after the install this upcoming week.  More to come shortly !

Soy Based Spray Foam Insulation

The house before spraying foam...we are adding an additional 2 inches of rigid foam on the West facing wall  due to the sun exposure.


Our Master Bedroom exterior wall after trimming excess foam


Our office walls just after foam was blown in and before it is shaved off flat for drywall

Main living space just after spraying and trimming.

Busy, Busy.....but I wanted to get some photos up of the insulation going in.  One of our green features of the home was to spray Soy Based Expanding Foam into all the exterior walls of the house.  Western Pacific Roofing did the great install and here you see one of the guys spraying the exterior wall on the back of the house.  This foam will help make the building envelope much tighter and more efficient, as well as having great sound deadening properties.   To help increase the R-value of this West facing wall, we will add an additional 2" of rigid foam to these walls, before stucco goes on,  to keep the heat out during the intense summer heat. 

We have been anxious to get to show you some of the more Green aspects of the remodel,  and over the next couple of weeks, will have the major pieces of our newly insulated home in place.  After the roof and stucco prep are complete, we get to move toward the inside finishes.......green cabinetry, counters and tile, LED lighting, low water consumption fixtures and more.  Be sure to check back and have a look!

Tuesday, August 31, 2010

Wow.....has it been a month?

Hey all,

Well summer seems to have gotten the best of me and my posting.  All I can say is  HOT !

Starting to cool a bit now that September has dropped in.  As you can see by this post, we finally have windows !  No small feat, but we are happy that the house is somewhat enclosed again.  We flanked the front door with replacement privacy glass and moved the operable piece to the upper part of the window to facilitate ventilation.. ( and to keep bugs out )

It certainly has modernized the look of the front, and the casements are very clean from the outside.  We kept the openings about the same and will replace the front door after we are done banging in and out with materials and tools.

The remaining windows, all Low-E and double paned of course for energy efficiency....are in place to help maximize our great views to the outside.


We raised the window height to 8 feet to help bring in light and to create a more dramatic view through to the pool area and the mountains beyond.

The door out from the kitchen to the rear patio ( eventually ) is a custom unit that helped us take advantage of a small opening.  A 5 foot slider would have been very tight for coming and going, so we decided to splurge on a commercial door with a 42" opening.  It looks great and really does the kitchen justice.

Next up:  More structural work for the carport ( now garage )....and exciting news for our Neil Kelly Kitchen, IceStone countertops and ModWalls Tile !

Sunday, July 25, 2010

Wiring, Plumbing and Framing......and a few other things

See?  I told you we would have ducting again.  Much slimmer and huge the ceiling more so we can feel less claustrophobic in our kitchen.  Aside from the ducting, you can see that we have started running the new electrical, finished most of the framing and rough plumbing as well.


Here is a view form the master through the bathroom to the living room again.  Starting to get a bit harder to see through all the stuff. That blue tape on the left will be a new window in the master bedroom as of next week ( I hope )

Right at the end of the kitchen, before you get to the garage door, we have install a nook for a stacked washer and dryer.  Directly behind it from this view, will be a run of kitchen cabinets all the way to the dining room.

This is the back side of the in wall toilet for the guest bathroom.  It backs up to one of the kitchen walls, and you see the old sunken recess for the previos shower stall. I think we may keep the sunken shower floor for the new shower, since the room itself is so small.  Every little bit helps !

Finally, we have a new opening in the roof for the addition of an evaporative cooler to be installed at a later date.  For those of you who have never heard of an evaporative cooler  ( or swamp cooler ) they are a very energy efficient way to cool your home here in the desert.  Basically, water is pumped through a large pad and air is pulled through the pad by a blower.  This cooled air is pumped through the house using the same A/C venting currently installed.  The electricity requirements are a fraction of what a traditional A/C unit would cost and you actually get some humidified air thrown into the house as a benefit.  It doesn't work in the later part of the summer when the dew point increases, but it can really offset your electrical bill during the warm months.

The floorplan takes shape again.

We have finished the concrete and have started framing out the interior walls for the master bedroom, master bath and kitchen walls. The original interior walls were framed in 2" x 6" material to allow for plumbing and venting to run in the walls. We decided to repeat that for the new framing between the kitchen and adjoining rooms to allow for a little more insulation, as well as allowing us to install an in-wall toilet for the guest bath.  Green Tip !  This particular toilet will be a dual flush design in order to help with water conservation.  Not a new concept, but we try and encourage our clients to try using dual flush technology, or at least adapt to the newer 1.28 gpf toilets that are now starting to appear on the consumer market.

The 2nd picture is looking from the new master bedroom through the new master bath toward the living room. The next in line is looking down the hall from the master to the living room.  Eventually there will be a line of closets on the right, and a pocketed door entrance to the bath on the left.


This next shot is looking from the backyard toward the new addition where the kitchen entry door will be. Notice our nice patio......sand.  Did I say there was alot of sand on our property?  Fortunately the feral cats love it...its like living in one giant litter box.  Anyone have a dog we can borrow?  I know...TMI.
There I am staring at the new kitchen walls, ( when did I get so gray? )our new and very expensive steel beam on the right holding things up, and a blank space where our A/C ducting should be ( will be installed again later ) right above the opening to the kitchen.  If you look back at the original pictures of the kitchen, you'll notice that the new kitchen is wider and now goes through to the garage directly.  The soffit for the ducting will be rebuilt and will not intrude into the kitchen quite as much as the old one did.

A little Video Extra......

I've been experimenting with video for the blog and have this one of the completed concrete work at the house.  I have a few others I will try and post, but this gives you an idea of the scope of work. I may have to do a bit of editing to make these videos work, but here goes !

Wednesday, July 7, 2010

Concrete Flows...and flows....

It's been awhile !  Lots of work still going on, just less time to post about it !  These shots are from the concrete pour couple of weeks ago.  You can see the prep with the rebar going in, and then our friendly concrete pumper and his remote controlled pump ( very cool ) pouring concrete into our new addition.

I was able to get the local concrete company to add fly ash to the mix.  Sounds like a funny term...fly ash...and no...it's not from burning flies.  Green Lesson !  Fly ash is a by-product of coal burning powerplants and by substituting fly ash for portland cemet in the mix, you use less cement.  You also avoid that fly ash going into the waste stream and it makes the concrete stronger.

The rest of the photos show the finishing of the slab and patches for the plumbing channels we ran in the old slab.  The final picture shows the floor finished and waiting for the concrete to set. 

From here we go on to framing and getting the walls up for running electrical, continuing the plumbing into the walls and gettin the gas lines set.  More pictures to follow !

Save Now